
Phase VI: Pedagogical Sensemaking and Journey Mapping
Research Questions:
- How does sustained participation in a PLC over multiple phases support teachers’ pedagogical sensemaking related to play, storytelling, making, and engineering?
- In what ways do journey maps highlight the nature of teachers’ experiences as they participate in a multi-year PLC implementation?
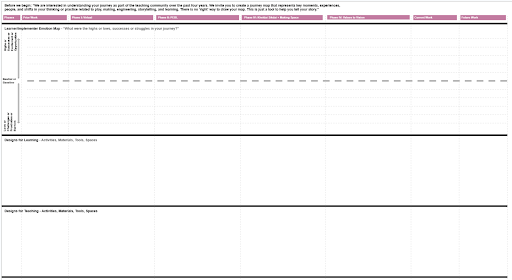
Journey Map Structure
Preparation: In-person
*1 participant (Please adjust the quantity accordingly)
Activity name | Materials | Quantity |
JM Protocol | JM Protocol printout (this document) | 1 |
Protocol Flow | Protocol Flow Slide deck (Review before interview) | 1 |
Recording | Audio Recorder | 1 |
Video Recorder (or mobile phone) | 1 | |
Printouts (Important) | Journey Mapping Template (Physically Printed 5 ft x 3 ft flex) | 1 |
1 | ||
General materials | Sticky Notes – 4 different color packs | 1 pack per color |
Sticky Notes – Small Size – 2 colors | 2 packs | |
Dot stickers 2 colors (if available) or | 12 pieces of each color | |
Color Sign-pens packs | 1 pack |
Journey Mapping Roles
(1 Participant + 3 Research team members) *Required Role. One person.
1 Facilitator*
- Guide the teacher to describe their journey as they recall experiences as teaching community members, then through the different lanes (Designs – Activities, Materials, Tools, Spaces; Pedagogical evolution- Change or Shift; Tensions or Dilemmas – Push and Pull; Community – People, Groups, Interactions; Sustainability – Structures, Strategies) of their participation. Be sure to ask “why” during the exploration.
1 Teacher (the storyteller)*
- Be guided by the facilitator to describe your experiences as participants in the multi-year PLC implementation centered around play, making, engineering, and storytelling.
1 Sticky note writer*
- At each point on the journey map, record concisely what the storyteller reports on a sticky note. One sticky note per idea. Keep up pace but if you need clarification, slow things down and ask.
- Make sure stickies line up vertically on the map (Important points, Activity, Annotations).
- Use consistent icons to denote shifts, people, interactions, etc.
1 Observer
- Watch the interactions of the facilitator and storyteller as they map the teacher’s journey. Use the Observation template to take notes!
- Note times as you go, so that it’s easy to go back into recordings. Ideally, have a column for observations (what they said and did), and a column for your interpretations and notes (what you think it means).
- Consider: What do you see? What do you think? What do you wonder?…about what you observed.
- This helps with the debrief, and speeds the synthesis process
Journey Mapping Protocol Flow
Steps/Timing | Details |
Introduction – 2/2 min |
|
Journey Map Framing – 3/5 min |
|
Map Structure – 5/10 min
|
|
1. Prior experiences – 5/15 min |
|
Emotion Map 2. Start: – 5/20 min |
|
3. Activities: – 10/30 min |
|
4. Tools & Materials: – 5/35 min |
|
Emotion Map: 5. Learner/ Participant ◯ – 15/50 min |
|
Emotion Map: 6. Connect the dots – 10/60 min |
Interview Questions:
|
7. Pedagogical Evolution – 10/70 min | Journey Mapping Prompts
differently afterward?
Interview Questions: Pedagogical evolution
|
8. Tensions or Dilemmas – – 10/80 min |
Interview Questions: Tensions or Dilemmas
|
9. People – 10/90 min | Journey Mapping Prompts
Interview Questions: Community
|
10. What Stayed & Faded – 10/100 min | Journey Mapping Prompts
Interview Questions: Sustainability
|
11. Future |
|
Reflection -10/120 mins |
|